Images can be inserted directly into Google Docs, but your ability to place them exactly where you want them in the document can sometimes be frustrating.


Sometimes you might not want the borders that come with inserting a table. The table is still in the next image, the borders are just not visible.

Here's how it is done
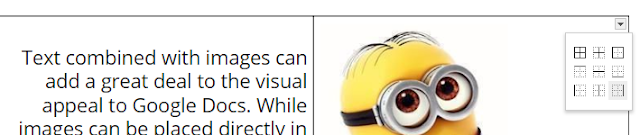
2. A small drop-down arrow will appear. If you click on it you can choose which borders you want to change.
3. Scrolling over the small boxes will tell you what each one does.
4. When you click on one of the border options you will see that the cells you've chosen will now have highlighted borders and a new table border menu will appear.

5. You can then use the dropdowns in this new menu to set the border to white or to 0pt and the border is no longer visible. There are also other border options you can set in this menu.
I think you can learn more about this one by doing, so I recommend creating a Google Doc and experimenting.
Let me know if you have any questions?
Next week I will share a bit about editing images in Google Docs.

4. When you click on one of the border options you will see that the cells you've chosen will now have highlighted borders and a new table border menu will appear.
5. You can then use the dropdowns in this new menu to set the border to white or to 0pt and the border is no longer visible. There are also other border options you can set in this menu.
I think you can learn more about this one by doing, so I recommend creating a Google Doc and experimenting.
Let me know if you have any questions?
Next week I will share a bit about editing images in Google Docs.


.png)


