When I am creating a HyperDoc or Tutorial in Google Docs, I love having some consistency in any Titles and Headings for that particular doc. Here are two samples where I've tried to model this idea.
When I am working in a document like the ones above that have multiple headings or titles I prefer to save a little time and set some headings that I want to use throughout the document right away. It is a great and quick way to have consistent font styles and sizes throughout a longer document.
The process is pretty simple. Here are the steps.
1. Create a title or heading and set the font style and size.
2. Highlight the title or heading text that you want to use throughout the document.
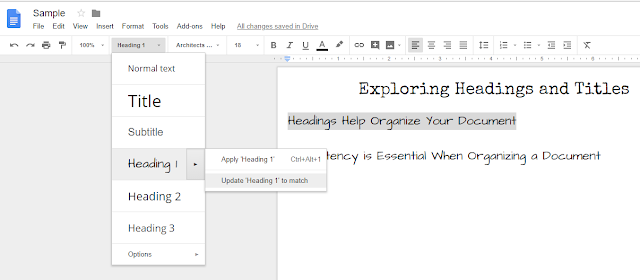
3. Click on the Dropdown arrow next to "Normal text" in the edit menu.

4. Scroll to the Title or Heading you and click on the arrow.
5. Choose "Update . . . to match" and you've now saved that Heading or Title as the new default for the document.
6. If you open the menu again, you will see that the Heading Title now matches the new font.
7. You can now use the drop-down menu to type in any of the default fonts you've created. You can also highlight existing text and change the font using this menu.
You can also set default Titles and Headings across your documents following the same tip as last week.
Next week I will share a bit about how tables can be used to arrange images and text in a Google Doc.


.png)


